In today's world, reaching a global audience is crucial for website owners. That's where Google Translate in WordPress comes in. It breaks down language barriers, allowing visitors to access your content easily. Whether it's a blog, e-commerce site, or business page, integrating Google Translate enhances the user experience and broadens your reach. Therefore, in this guide, we'll walk you through setting up Google Translate in WordPress. Don't worry if you're not tech-savvy, because we'll explain everything simply and offer plenty of tips. By the end, you'll be equipped to translate your WordPress website seamlessly and open doors to new possibilities. So, let's make your website accessible to everyone, regardless of their language!
What Is Google Language Translator?

Google Language Translator is a plugin designed to make your WordPress website multilingual. This plugin becomes your own personal translator right in your website!
With this plugin, visitors can easily translate your content into their preferred language, enhancing their browsing experience. Here's how it works: This plugin seamlessly integrates with your WordPress site. And, allows users to select their desired language from a dropdown menu or flag icons. The plugin utilizes the power of Google Translate to provide accurate translations in real time. For website owners, this plugin offers a simple yet effective solution to reach a wider audience. By making your content accessible in multiple languages, you can attract more visitors and increase engagement. Plus, setting up Google Translate in WordPress with this plugin is quick and hassle-free. This makes it a must-have plugin for any website looking to go global
Why You Should Set Up Google Translate In WordPress?
Setting up Google Translate in WordPress can revolutionize your website. It breaks down language barriers, opening your content to a global audience. This means more people can engage with your site, potentially increasing traffic and customers. Additionally, integrating Google Translate improves user experience by allowing visitors to read your content in their preferred language effortlessly. Moreover, offering translations demonstrates inclusivity and respect for diverse audiences, which can build trust and credibility.
It also benefits your website's SEO, as search engines recognize multilingual content and rank it higher in relevant searches. Plus, setting up Google Translate in WordPress is straightforward and cost-effective, requiring minimal effort and resources. By embracing Google Translate in WordPress, you can unlock a world of opportunities, expand your reach, and enhance user experience. And, elevate your website's overall effectiveness and impact. So, because of all these benefits, you should consider setting up Google Translate on your WordPress website. Moreover it has a huge benefit when practicing Local Seo Practices.
Steps To Set Up Google Translate In WordPress
Plugin Installation and Activation

To set up Google Translate in WordPress, first, you’ve to install a plugin named Google Language Translator. To do that, begin by navigating to the Plugins section and selecting the Add New option in the left-hand admin panel. Now in the Search box type "Google Language Translator" and press enter to search. This will display additional plugins for consideration. Scroll down until you locate the Google Language Translator plugin, then click the “Install Now” button and activate the plugin for use.
Accessing the Plugin Settings Page

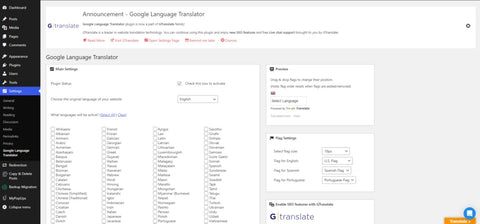
Head to the Settings section on the left-hand admin panel and select Google Language Translator. This action will open the main settings page.
Configuring Plugin Settings

Verify that the plugin is activated, although it should already be active by default. Ensure you've selected the current language of your website. The plugin typically preselects this, but double-check to confirm. In the Layout Settings section, you have two primary options. You can either translate from the original language (English) into any language or specify particular languages.
By default, it translates to all languages, but you can also choose specific ones. Be sure to select to display flags for each chosen language. In the Floating Widget Settings section, tick the box to enable translation. Once you've adjusted all relevant settings, click the “Save Changes” button.
Navigating to the Widgets Page
Proceed to the Widgets section by clicking on Appearance in the left-hand admin panel and selecting Widgets. Here, you can customize your website's sidebars and other sections to give it a unique appearance.
Adding the Google Translate Plugin to a Widget Area

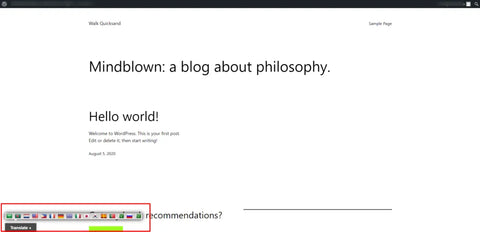
Locate the Google Language Translator widget and drag it to your preferred location. Click the “Save” button to add the widget to your website. Congratulations! You can now see the translate button on your site. Visitors simply need to click it, choose their language flag, and the page will be translated.
Conclusion
In conclusion, integrating Google Translate into your WordPress website brings numerous benefits. It breaks down language barriers, making your content accessible to a global audience. With Google Translate in WordPress, you can attract more visitors, increase engagement, and expand your reach beyond borders. If you are looking forward to build a website to target more than one country then you can use Premium WordPress themes from The Classic Templates.
We encourage you to take advantage of this powerful tool and customize translations to cater to diverse audiences. By offering multilingual content, you can demonstrate inclusivity and respect for your visitors' language preferences. This will help you in fostering trust and connection. So, embrace the power of Google Translate in WordPress today and unlock the full potential of your website on a global scale. Also above we talked about WordPress themes so there is an addition to this that you can also go for the WordPress theme bundle if you are lookin for a bulk purchase of wordpress themes.

